Simple to make, yet full of volume and flavor with an elastic crumb. This is the milled flour sourdough sandwich loaf recipe you’ve been looking for! Mix, rise, shape, rise, and bake all in one day!

The problem with sourdough milled flour
The biggest complaint I hear from those wanting to transition to fresh milled flour sourdough is the huge shift in the density of the bread in comparison to using conventional flours. The second biggest complaint I hear is just how complicated all the easily accessible recipes seem to be. When I set out to create my own recipe, those were the top two priorities I set out to overcome.
Not only was I able to overcome those big issues, I was able to find a way to do it without using a smidge of commercial yeast. This means this recipe uses 100% fresh milled flour, including the feeding of the sourdough starter.
Not only is this recipe delicious, but it is also extremely simple. No strange ingredients. No stretching and folding every 30 minutes for hours. All you do is mix, 1-2 stretch and folds, rise, shape, rise, and bake!
Tips for the perfect sandwich loaf
Do NOT skip the autolyse step. It is crucial for the workability and the rise of your bread.
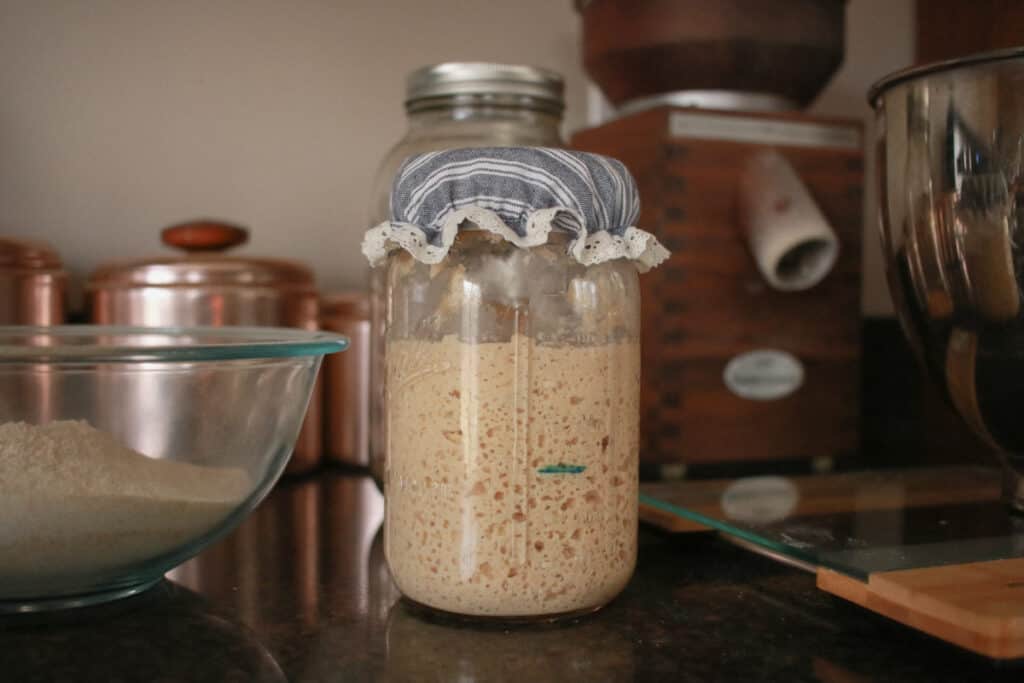
Be sure your starter is at peak doubling when you begin mixing your dough.
Watch the dough, not the clock. Do not allow your dough to overproof or it will result in flat, dense, and too sour bread.
If you can help it, use a stand mixer instead of hand kneading. Because this is a wet dough, kneading is much easier in a stand mixer.
Tools you may need
I’m somewhat of a minimalist in the area of bread making tools. This is mainly because I am fairly frugal. But, also because collecting physical clutter translates into major mental clutter for me. The tools we do have I use extremely often for their form and function. You can find a list of those items here.

Sandwich loaf ingredients
- Active sourdough starter: I keep my sourdough starter at 100% hydration which means I feed it with equal weights (grams), not volume, of flour and water. An active sourdough starter is one that has been fed within 4-12 hours (will vary based on room temperature), has doubled in volume, and is bubbly.
- Water: Make sure to use room temperature filtered water, especially if your tap water contains chlorine.
- Fresh milled hard white wheat flour: It’s important to select a hard white wheat variety for this recipe. Hard wheat contains more gluten than soft white, and you need the extra gluten to produce a stretchy dough. The stretchiness of the dough directly impacts the rise height.
- Salt: I personally use Celtic Sea Salt. You definitely don’t want to skip this part. It enhances the flavor.
- Honey: I like to use honey in this bread, as a natural sweetener alternative.
- Avocado or Olive Oil: Avocado oil is a neutral oil with a high smoke point, so it won’t deteriorate at high baking temperatures. However, most available sources of avocado oil are questionable in its adulteration. Extra virgin olive oil is a great alternative!

The steps to a milled flour sourdough sandwich loaf
If you would like to mix, rise, shape, and bake all in one day, see the sample baking schedule below. Keep in mind that the temperature of your home can greatly impact the rise times so you will need to keep watch and adjust as needed.
Beginning with an active sourdough starter and fresh milled flour is crucial. Fresh milled flour deteriorates quickly once it’s been milled.
Mixing the dough
Place the sourdough starter, water, fresh milled flour, oil, and honey in the bowl of a stand mixer. Using a dough hook, knead on low speed for 3-5 minutes until just roughly combined. There should be no dry bits left in the bowl. This is a fairly wet dough so keep in mind that is the consistency you are looking for. At this point you will cover the dough for 30 minutes to autolyse.

Autolyse is just a fancy term for letting the dough rest before the full kneading and adding the salt. Typically the autolyse process is just with flour and water. With the intention of creating the simplest recipe, I tested it this way and it works beautifully. This step is crucial, especially with fresh milled flour because it takes time for the flour to absorb the water and improve the workability of the dough. It helps rid the temptation of wanting to add more flour, resulting in dense bread.
After the autolyse step, you are ready to add the salt and complete the final kneading. Turn your stand mixer on low speed again for 15-20 minutes. Complete 1-2 stretch and folds (no wait time in between stretch and folds) or until the dough appears to stay taut and the tension is built in the dough.
The dough should be close to passing the windowpane test at this point, although windowpane is pretty difficult with fresh milled flour. The dough should be sufficient as long as it’s stretchy and doesn’t break apart as soon as you stretch the dough.


First rise (bulk fermentation)
Transfer to a very lightly greased bowl, turning once to grease the top of the dough.
Cover and allow to rise at room temperature until doubled, about 3-6 hours. The rise time will depend on the temperature of your kitchen and the activity of your sourdough starter prior to using.


If you are wanting to speed up the rise time, putting your dough in a warm spot is helpful. Most often, I turn on my oven light, put the covered bowl of dough on a rack in the oven, and keep the door cracked open so that it doesn’t get too warm and deactivate my starter.
Alternatively, if you would rather slow it down to bake your dough the following day, you could let your dough rise at room temperature for about 1-3 hours and then finish the bulk fermentation in the fridge for 10-12 hours or overnight. This can help you control the rise time, especially in the summer months. However, in the winter I find that a complete room temperature rise yields the best results for me.
Forming the sandwich loaf
Once the dough has doubled (or finished rising in the fridge overnight), it’s time to form it into a loaf.
Grease a 9×5 inch loaf pan with butter and set it aside. Turn the dough out onto the countertop. I do not see the need to flour my surface, but feel free to grease or lightly flour your surface if needed.

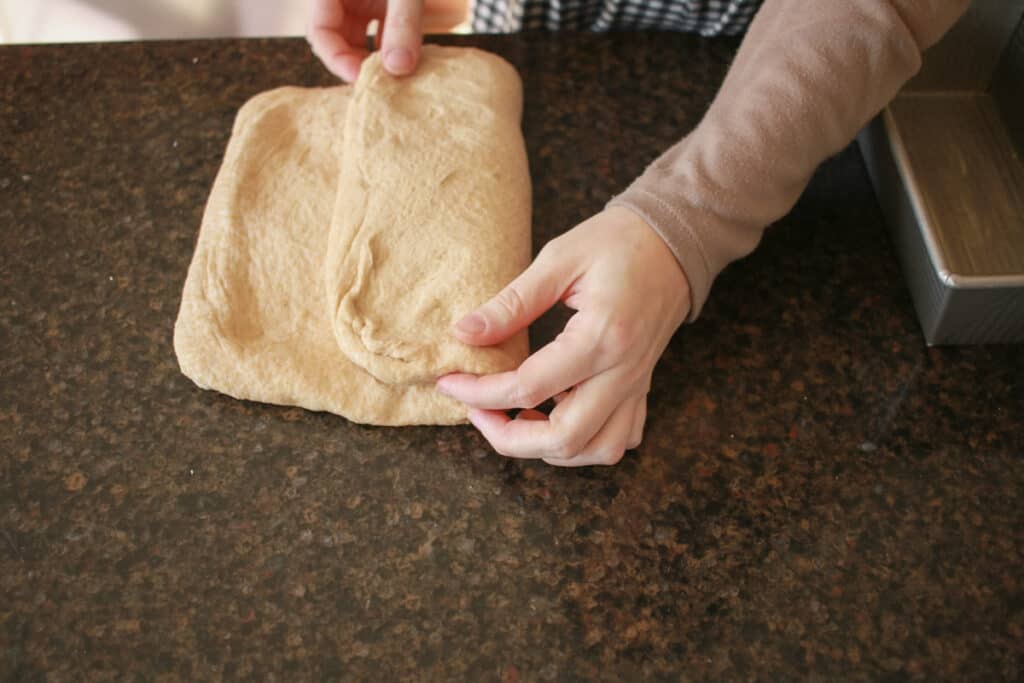
First, press the dough out into a rectangle with your fingers with the long side approximately the length of your loaf pan. Fold the dough in thirds, being sure to overlap the folds on each other. Tightly roll the dough in the opposite way that you folded it, small side to small side.


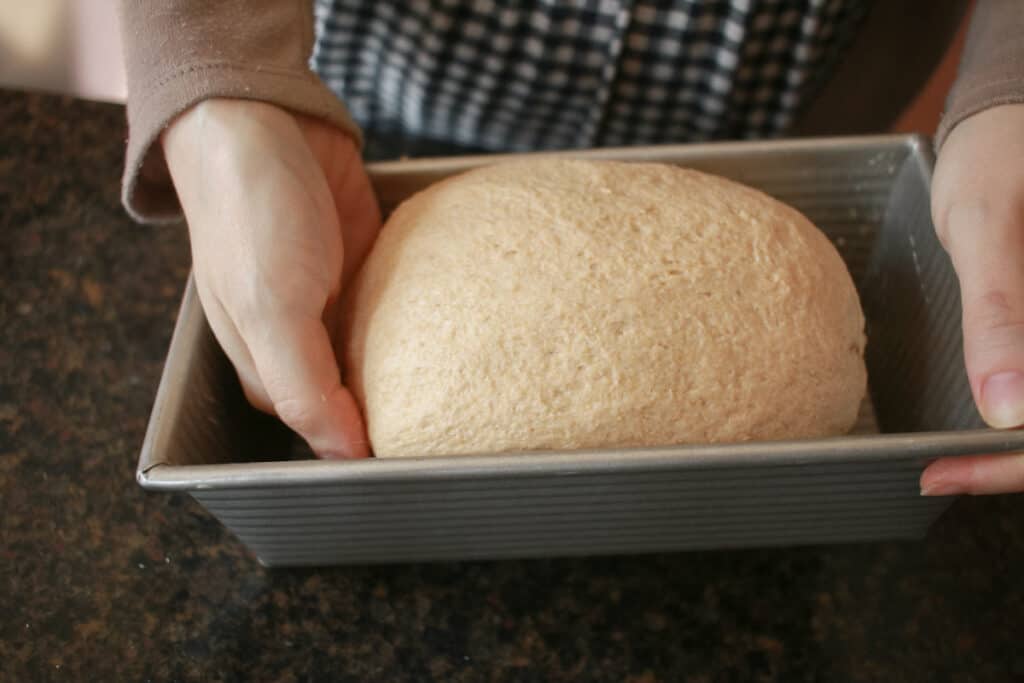
Make sure to pinch to seal the seam really well, along the bottom and on both sides. Place the loaf into the prepared pan. With the pan lengthwise, cup your hand and run your fingers along the inside of the pan on each side and against the dough to help the dough form the desired shape. Cup your hand again to tuck both width ends underneath, forming the desired shape.


Second rise
Cover and allow to rise at room temperature until it rises over top of the loaf pan.

I prefer my bread to pillow over the edges of the pan a little, so I just wait until it has risen to where the pillowing is visible. This can take anywhere from 2-5 hours depending on the warmth of your kitchen.

Bake
Preheat your oven to 400 degrees. When almost preheated, beat one egg with 1 tablespoon of water. Brush the egg wash mixture evenly on the surface of the dough using a pastry brush. Place the loaf pan on a baking sheet so that the egg mixture doesn’t drip onto the bottom of your oven.
When the oven is preheated, place the loaf pan and baking sheet in the oven and bake for 10 minutes at 400 degrees. Lower the temperature of the oven to 350 degrees and bake for an additional 30 minutes, or until the loaf is dark golden brown.
Remove the loaf from the oven and allow the bread to cool in the pan for 5-10 minutes. Carefully remove from the pan and allow to dry on a cooling rack for at least an hour before slicing into it.

Sandwich loaf sample baking schedule
Complete room temperature rise
- 10pm the night before: Feed your sourdough starter.
- 6am the following morning: Begin the process of mixing the dough and first rise.
- 11am: Form the dough into a loaf, cover, and let rise over the top of the pan.
- 2:30pm: Apply egg wash and bake.
Partial refrigerator rise
- 11am: Feed your sourdough starter.
- 7pm: Mix the dough and allow to rise at room temperature for 1-3 hours, then in the fridge for 10-12 hours or overnight.
- 8am: Form the dough into a loaf, cover, and allow to rise over the top of the pan.
- 1pm: Apply egg wash and bake.

Storing
I keep my bread in a plastic bag with a zip top to prevent it drying out. I know some people also have success with beeswax wrap.
If you would like to store it more long term, you can place it in the freezer, well-wrapped, for up to 3 months.
Find more fresh milled sourdough recipes here!
If you try this recipe and love it, I would love if you could come back and give it 5 stars and tag me on Instagram @olivebranchacres !

Easy Sourdough Sandwich Loaf Made with Milled Flour

Simple to make, yet full of volume and flavor with an elastic crumb. This is the milled flour sourdough sandwich loaf recipe you’ve been looking for!
Ingredients
- 440 grams fresh milled hard white wheat flour
- 255 grams water
- 240 grams active sourdough starter
- 50 grams honey
- 28 grams olive or avocado oil
- 10 grams salt
- Egg and tablespoon of water for egg wash
Instructions
- Place the water, starter, flour, honey, and oil in the bowl of a stand mixer with the dough hook attachment. Knead the dough on low speed for 3-5 minutes or until the dough is roughly combined and there are no dry bits left in the bowl.
- Autolyse for 30 minutes.
- Add salt and knead on low speed for 15-20 minutes or until smooth and elastic.
- Perform 1-2 stretch and folds (without wait times in between each) until the dough appears to stay taut and the tension is built in the dough. The dough should roughly pass the windowpane test at this point.
- Transfer to a very lightly greased bowl, turning once to grease the top of the dough. Cover and allow to rise at room temperature until doubled, about 3-6 hours (see note).
- Grease a 9x5-inch bread pan with butter or oil. Turn the risen dough out onto your work surface. Press the dough out into a rectangle with your fingers with the long side approximately the length of your loaf pan. Fold the dough in thirds, being sure to overlap the folds on each other.
- Tightly roll the dough in the opposite way that you folded it, small side to small side. Make sure to pinch to seal the seam really well, along the bottom and on both sides.
- Place the loaf into the prepared pan. With the pan lengthwise, cup your hand and run your fingers along the inside of the pan on each side and against the dough to help the dough form the desired shape. Cup your hand again to tuck both width ends underneath, forming the desired shape.
- Cover and allow to rise at room temperature until it rises over top of the loaf pan, approximately 2-5 hours.
- Preheat your oven to 400 degrees. When almost preheated, beat one egg with 1 tablespoon of water. Brush the egg wash mixture evenly on the surface of the dough using a pastry brush. Place the loaf pan on a baking sheet so that the egg mixture doesn’t drip onto the bottom of your oven.
- When the oven is preheated, place the loaf pan and baking sheet in the oven and bake for 10 minutes at 400 degrees. Lower the temperature of the oven to 350 degrees and bake for an additional 30 minutes, or until the loaf is dark golden brown.
- Remove the loaf from the oven and allow the bread to cool in the pan for 5-10 minutes. Carefully remove from the pan and allow to dry on a cooling rack for at least an hour before slicing into it.
Notes
- Alternatively, if you would rather bake your dough the following day, let your dough rise at room temperature for about 1-3 hours instead of 3-6 (in step 5) and then finish the bulk fermentation in the fridge for 10-12 hours or overnight. Continue with step 6, increasing the second rise time, when you are ready to continue the following day. I get better results with the room temperature rise, but controlling the rise time can be really helpful at times.
- I keep my sourdough starter at 100% hydration which means I feed it with equal weights (grams), not volume, of flour and water.
- An active sourdough starter is one that has been fed within 4-12 hours (will vary based on room temperature), has doubled in volume, and is bubbly.
Nutrition Information:
Yield:
16Serving Size:
1Amount Per Serving: Calories: 155Total Fat: 2gSaturated Fat: 0gTrans Fat: 0gUnsaturated Fat: 1gCholesterol: 23mgSodium: 266mgCarbohydrates: 29gFiber: 1gSugar: 3gProtein: 5g